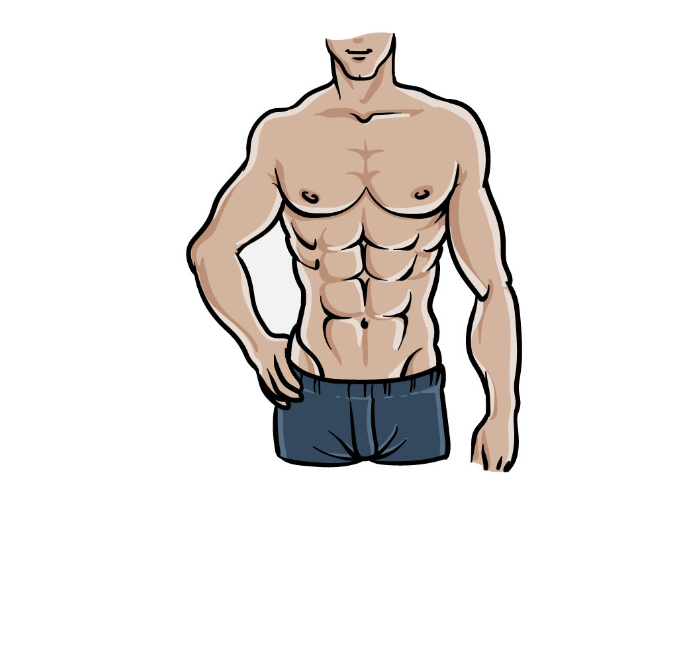
How to draw a torso It’s easy to expect that the more comfortable you are with a subject, the simpler it will be.
Since we each have a middle that it would be not difficult to draw, yet entirely, it’s not unexpected the inverse!
Figuring out how to draw a middle can be very precarious as muscles and characterizing subtleties need to look unmistakable.
Even though it is precarious, it may be much more straightforward with the proper aid.
!This bit-by-bit guide on the most proficient method to draw a middle will make taking on that precarious drawing significantly more straightforward and more tomfoolery.
If you are looking for drawing ideas, cool drawings, cute drawings, drawing for kids, cartoon drawings, girl drawing, 3d drawing and many more, then you are at the right place, here you will get all of these drawings. how to draw hand
Stage 1:
We’ll begin straightforwardly in this initial step of our aid on the most proficient method to draw a middle.
For now, we will chip away at the middle’s jaw, neck and shoulders.
Utilizing bent lines, you can begin the adjusted sides of the facial structure; then, there will be a round jaw underneath.
Then, at that point, you can broaden two short lines down for the neck, and afterward, these will reach out into the flat lines of the shoulders.
That will be all we make sure of for this step, and you are prepared to make the following strides.
Stage2:
Some portion of your middle drawing ought to be genuinely easy to do.
To begin with, utilize a bent line for the man’s grinning mouth.
Then, at that point, there will be one more, a lot more modest line underneath.
Then you can finish this step by adding two additional bent vertical lines to the shoulders to finish them.
Stage 3:
Further down in this aide on the most proficient method to draw a middle, we will then, at that point, begin with the man’s chest.
To draw them, first utilize bent, even lines that meet in the middle of the chest muscles.
Then you can polish off those muscles with little, level oval shapes close to the focal point of the muscles.
Stage 4:
I will add the principal arm in this step of your middle drawing.
The arm can be one of the most troublesome aspects of the body, so make sure to go slowly as you draw!
By utilizing bent lines, you can expand the biceps from the shoulders.
Then there will be the elbow knock which will then, at that point, lead to the lower arm.
The wrist will be very meager and prompt the hands for certain bent lines for the fingers.
Whenever you have drawn this arm, you can involve an uneven line for the side of the ribs on the left.
You can then complete the ribs with a couple of additional lines inside the framework of the ribs, as displayed in the reference picture.
To walk:
You’ve drawn an arm such long ways in this aide on the most proficient method to draw a middle, and keeping in mind that it will make drawing that second one a piece simpler, it’ll, in any case,
be a piece precarious because the arm is at an alternate point from the first.
The standard will be very comparative, be that as it may, and utilizing the reference picture, you can repeat the muscles you drew before, except the shape will be a piece different for each.
Stage 6:
Your middle drawing is, as of now, dazzling! We will add a few more modest subtleties in the subsequent stages,
beginning with the abs in this part. As you can find in our reference picture,
these will be drawn with bent lines that associate with one another with a specific goal. Then you can involve a couple of additional lines for the beginning of his shorts.
Stage 7:
The image is finished now, and you have a couple of additional subtleties to include in this guide on drawing a middle.
You can finish the plan using straight and bent lines by adding the shorts he is wearing.
Before continuing toward the last step, you can likewise add your components!
These could incorporate a foundation or draw the remainder of her face and body.
Stage 8:
Since you have finished this middle drawing, the last step will be to rejuvenate it for certain astonishing tones!
In our reference picture, we showed you only one method for shading this picture.
You can put it all on the line, and here you ought to set your inventiveness free and play around with it!
For a complete picture. We can hardly hold on to perceive how you finish this picture.
also read:Are Gaming Laptops Under $300 Used for Graphics? – Extensive Guide